背景 最近在找工作,然后看到boss直聘的论坛上,一个前端招聘者在抱怨招不到合适的人,面了一大堆人,工作2-3年的,用JavaScript实现一个链表都寥寥无几,都没有聊下去的欲望….
所以在这了准备在写这篇博客,表明我实现过哈哈哈😂,抖个机灵,毕竟自己之前也是面试官,喜欢出一些开放型的题目去考察面试者,其实我看来这位面试官考察的这个问题,除了考察这个问题本身,更多的是看你的分析问题的能力,和抽象思维
下面就来分析下如何用JavaScript实现一个链表
链表是什么? 线性表的链式存储表示的特点是用一组任意的存储单元存储线性表 的数据元素(这组存储单元可以是连续的,也可以是不连续的)。因此,为了表示每个数据元素与其直接后继数据元素 之间的逻辑关系
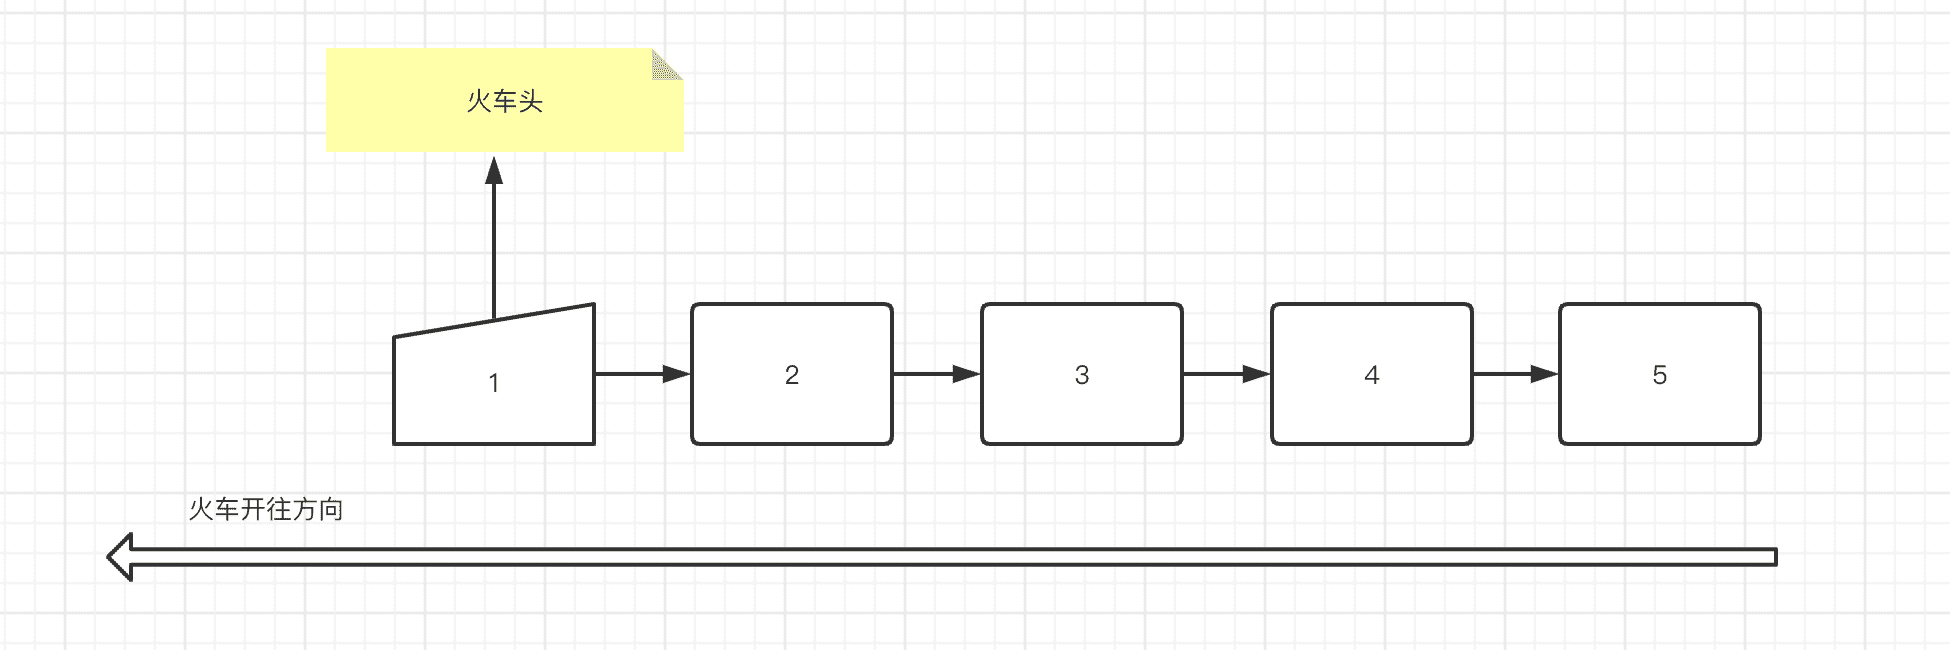
上面是百度百科的解释,我画了一张图让大家更便于理解
如果用生活中的例子代替火车就是最抽象的例子
每一个节点包含自己外,还包含一个指针,这个指针可以指向到下一个节点,形成一种,以此类推,形成的一个链式结构,就叫链表
链表还分为
知道链表是什么后,下面来分析一下如何用JavaScript实现一个单链表
JavaScript如何实现链表? 首先,链表是基于一个个节点来组装实现的,首先我们需要创建一个辅助类来实现
其次,由于JavaScript没有指针的概念,我们在实现节点的时候需要用对象的属性去模拟指针
然后,我们要知道链表都有哪些API,如何去操作链表,然后再去逐步的实现这些方法
最后整理出来需要哪些功能
实现辅助类 Node,模拟链表中的节点
节点属性的:本书节点
节点的属性:next指向
链表类的API
getHeader 获取链表头
append 向链表中追加元素
insert 向链表中的某一个位置插入元素
removeAt 删除链表中的某一个元素
indexOf 查询链表中是否有这个元素
捋清楚这个整体思路后,下面按照这个大纲来实现
Node辅助类实现 class Node { constructor (item ) { this .item = item; this .next = null ; } }
链表类的实现 class LinkedList { head = null ; length = 0 }
append class ListedList { head = null ; length = 0 append (item ) { let node = new Node (item); if (this .head ) { let current = this .head ; while (current.next ) { current = current.next ; } current.next = node; } else { this .head = node; } this .length ++; } }
insert class LinkedList { insert (position, item ) { if (position > -1 && position < this .length ) { let node = new Node (item); if (position === 0 ) { let current = this .head ; this .head = node; node.next = current; } else { let index = 0 ; let previous = null ; let current = this .head ; while (index < position) { previous = current; current = current.next ; index++; } previous.next = node; node.next = current; } this .length ++; } else { console .warn ('position的值越界了' ); } } }
removeAt class LinkedList { removeAt (position ) { if (position > -1 && position < this .length ) { if (position === 0 ) { let current = this .head ; this .head = current.next ; } else { let { current, previous } = this .#getPrevAndCurrentNode (position); previous.next = current.next ; } } else { console .warn ('position的值越界了' ); } this .length --; } }
indexOf class LinkedList { indexOf (item ) { let index = 0 ; let current = this .head ; while (current.next ) { current = current.next ; if (current === item) { break ; } else { index++; } } return index } }
getHead class LinkedList { getHead ( return this .head ; } }
代码优化 && 完成例子 从上面我们观察到,insert,和removeAt这两个方法都用到了position 去获取上一个元素和当前元素,那么我们可以把这方法抽离出来进行一个代码结构的优化,下面给大家展示一下完整的例子
class Node { constructor (item ) { this .item = item; this .next = null ; } } export class LinkedList { head = null ; length = 0 ; append (item ) { let node = new Node (item); if (this .head ) { let current = this .head ; while (current.next ) { current = current.next ; } current.next = node; } else { this .head = node; } this .length ++; } insert (position, item ) { if (position > -1 && position < this .length ) { let node = new Node (item); if (position === 0 ) { let current = this .head ; this .head = node; node.next = current; } else { let { current, previous } = this .#getPrevAndCurrentNode (position); let node = new Node (item); previous.next = node; node.next = current; } this .length ++; } else { console .warn ('position的值越界了' ); } } #getPrevAndCurrentNode (position ) { let index = 0 ; let current; let previous; if (!this .length > 0 ) { console .warn ('当前为空' ); return undefined ; } if (position > -1 && position < this .length ) { let current = 0 ; if (position === 0 ) { previous = null ; current = this .head ; } else { let current = this .head ; while (index < position) { previous = current; current = current.next ; } } } else { console .error (`position的值 "${ position } " 不符合规范` ); } return { current, previous }; } removeAt (position ) { if (position > -1 && position < this .length ) { if (position === 0 ) { let current = this .head ; this .head = current.next ; } else { let { current, previous } = this .#getPrevAndCurrentNode (position); previous.next = current.next ; } } else { console .warn ('position的值越界了' ); } this .length --; } indexOf (item ) { let index = 0 ; let current = this .head ; while (current.next ) { current = current.next ; if (current === item) { break ; } else { index++; } } return index; } getHead ( return this .head ; } }
不到200行代码,就这样一个单向链表就实现了😂
最后 最后说下我个人的理解,其实学习数据结构出了数据结构本身,更多的是学习一种解决问题的思维,能够举一反三,你知道的东西多了都熟悉了,才有能力去创新。
后面打算写一些非技术型的文章,输出下别的内容哈哈🤪
